Single Blog Post Template Overview and Installation
Demo Layouts: https://diviwp.com/ui/theme-builder/single-blog-posts/
Overview
Single Blog Post Templates are Templates that can be applied on a Global level to display your existing or new blog post content.
This means that even if your blog post content is created in the Classic Editor, Gutenberg or even using the Divi Builder, once you setup, import and apply your chosen template to display your blog posts via the Theme Builder, it will use the layout you select to display the contents of the blog post.
This is because each layout uses the Post Content Module to display the contents of your blog post.
Fast, Flexible and Mobile Optimised
These Blog Post Templates have been designed with speed in mind. You won’t find any fancy animations or unnecessary elements.
The focus is on the content and the purpose of the layout is make the content readable and engaging.
Editing the demo content
Each DiviWP Blog Post Template can be edited using the Visual Builder.
You can make your changes to various module settings, upload new images, change colors, toggle between the desktop, tablet and mobile views and publish your page to achieve the look in the demo.
In some sections outlined in each individual Blog Posts documentation, Custom CSS is necessary to achieve a desired affect or an optimal responsive user experience and where the Divi Builder was unable to do it with its Module settings alone.
Related documentation:
- Can I edit Module labels?
- Can I modify Layouts or Sections?
- Custom CSS - How and Why It's Used in Sections
- How are admin labels used in Sections, Rows, Columns and Modules?
- What if I don't want to use any Custom CSS?
Support is always on hand
You can rest assured that support is always on-hand and we'll be able to guide you as far as possible should you require assistance with any custom CSS we have included in our layouts, templates or sections.
Creating a New Template within your Theme Builder
From the WordPress Dashboard, navigate to Divi > Theme Builder. Then click the “add new template” empty square.

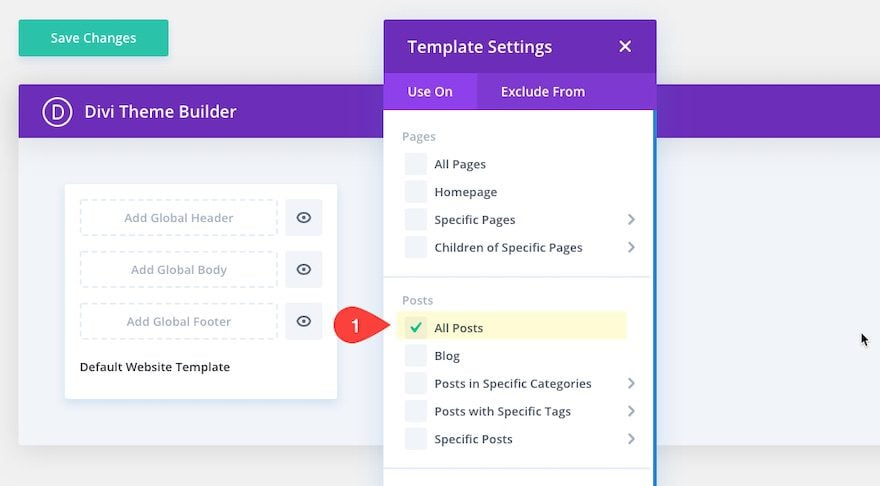
Assigning the Template to All Blog Posts
Once you add a new template, the template settings box will pop up allowing you to assign the template to pages and/or posts throughout your website. Since we want to create a blog post template for all of the blog posts site-wide, select “All Posts” and click the create template button.
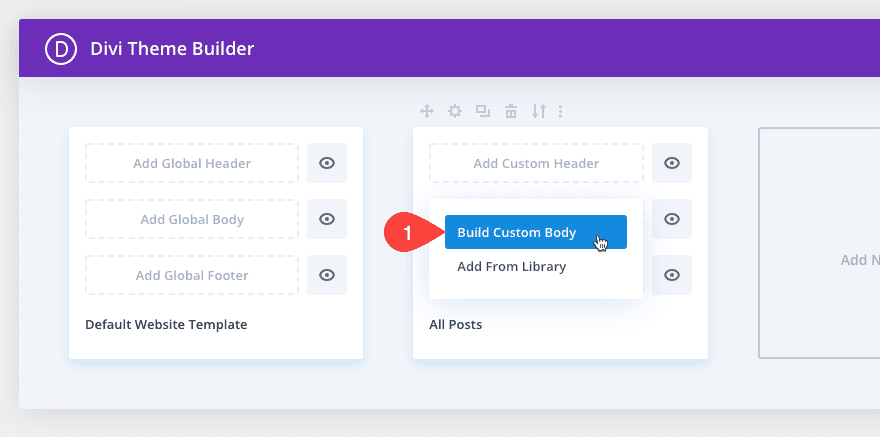
Creating a Custom Body Area Layout
Next, click the “Add Custom Body” area of the template to create a new body area for the post template. Then select “Build Custom Body”.
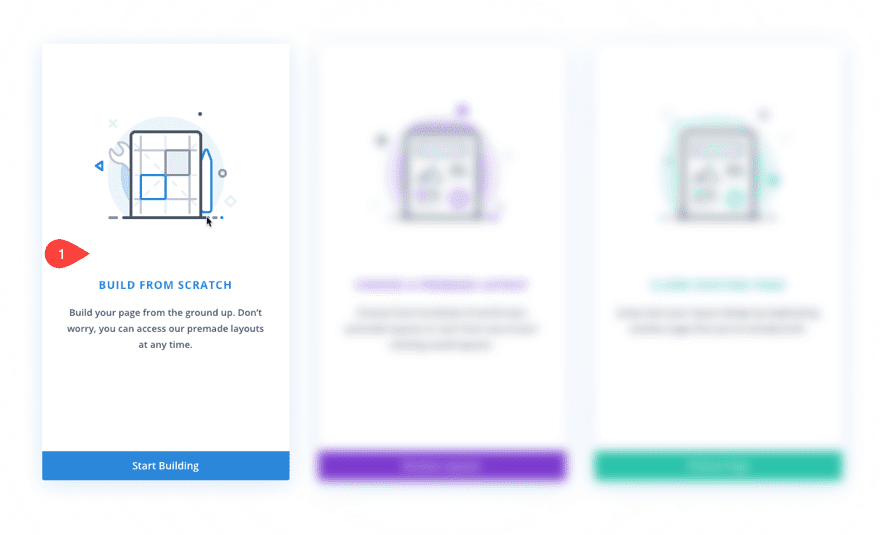
Select the “Build From Scratch” option to start the building process.
Importing your desired DiviWP Blog Post Template
All you have to do now is drag-and-drop your JSON file or use the Portability button to import your post template:

You can read more about importing layouts and sections here
Import via the Portability System
If you're not comfortable dragging and dropping the JSON file into your template, then you can import files directly into your Template or Page via the Divi Builder.
If you're editing on the front-end then clicking on up and down arrow will open the Portability options.

If you're editing on the back-end then clicking on up and down arrow will open the Portability options.

You will then see the following settings modal:

Choose your file, in the image above we're using a homepage 1 example JSON file but you'll use your blog post template of choice.
You can optionally select "Replace existing content" if you want to remove any of your sections you've already designed. If you do not check this option then the layout will load beneath your last section.
You can optionally select "Download backup before importing". You do not need to select "Apply Layout's Defaults To This Website".
Finally, clicking on "Import Divi Builder Layout" will import your layout to your Theme Builder Template or Page.
When the import is finished, the page will reload and you can start to make your changes!
Refer to each Blog Posts documentation for further customizations: