Mega Menu Headers
Default Mega Menu Support
All Headers include Default Mega-Menu support on Desktop.
Refer to Header 2 for an example.
Follow this tutorial for setting up your Mega Menu: https://www.elegantthemes.com/documentation/divi/mega-menus/

2 and 3 column Mega Menu drop-down options
Header 13 includes a beautiful 2-column mega-menu design and an optional fullwidth menu item button:
 While Headers 14 - 20 includes a 3 column design and an optional fullwidth menu item button:

Setting up 2 column mega menus
In order to create the 2 column mega menus as per the demo example above, you'll need to setup your menus via the:
WordPress admin dashboard → Appearance → Menus
You'll need to create a nested hierarchy as per the example menu setup below:

As we're using "Sections" as the parent menu item, we need to set a custom CSS class for the menu item.
Your parent menu item needs to have a custom class set to "mega-menu two-column" as per the screenshot below:

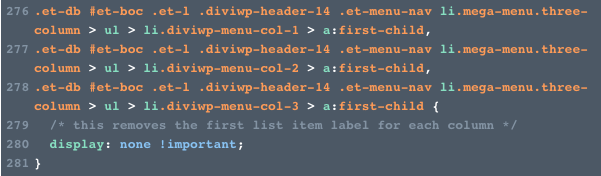
The Col 1 and Col 2 Menu items are not displayed in the menu and are used to create the column structure.
You can optionally display these menu items in your menu by changing display:none to display:block on line 279 of the Custom CSS module included in the section.

They will also need to have custom classes set as per the below example:
Col 1 will need to have "diviwp-menu-col-1" set:

Col 2 will need to have "diviwp-menu-col-2" set:

Finally, if you would like to keep the included styling for the last menu item button styles then you'll need to include the class "fullwidth" as per the example:

The CSS for the fullwidth button styles can be found in the Custom CSS module included with the section. Scroll down to line 319 and adjust to your liking:

You can of course choose to apply your own classname and style it however you wish or remove that menu item completely.
Setting up 3 column mega menus
In order to create the 3 column mega menus as per the demo example above, you'll need to setup your menus via the:
WordPress admin dashboard → Appearance → Menus
You'll need to create a nested hierarchy as per the example menu setup below:

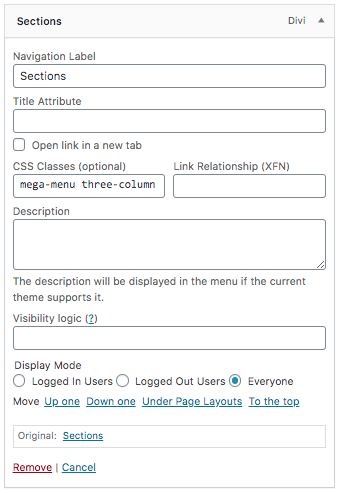

Col 2 will need to have "diviwp-menu-col-2" set,
Col 3 will need to have "diviwp-menu-col-3" set
Finally, if you would like to keep the included styling for the last menu item button styles then you'll need to include the class "fullwidth" as per the example:
The CSS for the fullwidth button styles can be found in the Custom CSS module included with the section. Scroll down to line 319 and adjust to your liking:

You can of course choose to apply your own classname and style it however you wish or remove that menu item completely.
Positioning the caret triangle for your 2 column or 3 column mega menu:
Depending on which parent menu item you're going to use for your 2 or 3 column mega menu, you'll need to adjust the positioning accordingly.
You can do this by opening up the Custom CSS module and then playing around with the percentage value on line 308 to position the caret how you'd like it:

Dealing with uneven menu items in 2 or 3 column mega menus
2 and 3 column mega menu styles work best when there are even number of menu items for each column.
If you have an uneven menu items for each column, then the last menu item won't have a border bottom and will look inconsistent with the design.
Here's an example, notice how the "Newsletter Sections" menu item doesn't have a border bottom and therefore looks a bit out of place and:
 You can get resolve this by editing the Custom CSS module included in the section and editing the border-bottom on line 300:

Here's an example of the same menu with the border-bottom set to 1px solid #ececec:
